AAT-IP Suite for ITCH-OUCH Demo Instruction
4.1 ITCH-OUCH Market Server Setup
4.2 Host System Initialization
5.2 MCS File Programming via PCIe
1 Overview
The Accelerated Algorithmic Trading IP Suite (AAT-IPS) provides an ultra-low-latency trading solution that leverages FPGA technology to accelerate market data processing and order execution. This demo, built on AAT-IPS, minimizes network and processing latency to achieve deterministic, high-performance trading behavior. It targets the ITCH/OUCH protocol pair, originally defined by NASDAQ for market data dissemination and order entry, and demonstrates a complete FPGA-based trading workflow. This includes ITCH market data reception, order book maintenance, pricing decision logic, and OUCH order transmission, all optimized for ultra-low latency operation.
A key component of the AAT-IPS framework is the pricing engine, which is implemented using High-Level Synthesis (HLS). Trading strategies are developed using a C/C++-style coding model, allowing users to rapidly modify and evaluate custom logic without redesigning the underlying hardware architecture. This approach significantly reduces development time and enables fast iteration from strategy development to live trading evaluation.
The demo runs on the Alveo X3522 accelerator card and demonstrates system performance over a 10G Ethernet connection. The X3522 is equipped with two DSFP28 ports, each capable of supporting up to two independent 10G Ethernet channels.
In this demo, two 10G Ethernet channels are used to support both UDP and TCP traffic, with the following roles:
1) Market Data Channel (UDP): Transmits sample market data using the ITCH protocol over UDP.
2) Trading Control Channel (TCP):
· Receives orderbook snapshot data using ITCH over TCP.
· Transmits order messages using the OUCH protocol over TCP.
To set up the demo system, a target PC equipped with two 10G Ethernet ports is required. The demo running on the Alveo accelerator card is launched using the “aat-itch-ouch” application. During operation, sample market data is injected into the system using the “itch-feed-replay” application, while order reception and market interaction are handled by the “itch-feed-replay” application.
The following hardware and software environment was used to produce the results presented in this document.
Hardware Environment
1) Supported Alveo accelerator card: X3522
2) Host system for Alveo accelerator card:
· CPU: Intel Core i7-14700K
· Motherboard: MSI Z790-P
3) Programming cable: Alveo Debug Kit (ADK2)
4) Ethernet connectivity for X3522:
· Two 10G Ethernet channels using 2 x SFP+ Active Optical Cable (AOC):
https://www.10gtek.com/10gsfp+aoc
· Four 10G Ethernet channels using 2 x 50G DSFP breakout DAC:
https://ascentoptics.com/product/50g-dsfp-to-2x-25g-sfp28-breakout-dac-1m.html
5) Target system network interface: Two 10G Ethernet ports using a 10G Ethernet NIC
Software Environment
6) Vivado Design Suite installed on the host system to program the Alveo card
7) Target system configuration:
· Operating System: Ubuntu 22.04 LTS Server
· Market Emulator: itch-ouch-market
· Packet Replay Tool: itch-feed-replay
·
Market Data: Sample market data file (itch-market-data.pcap)
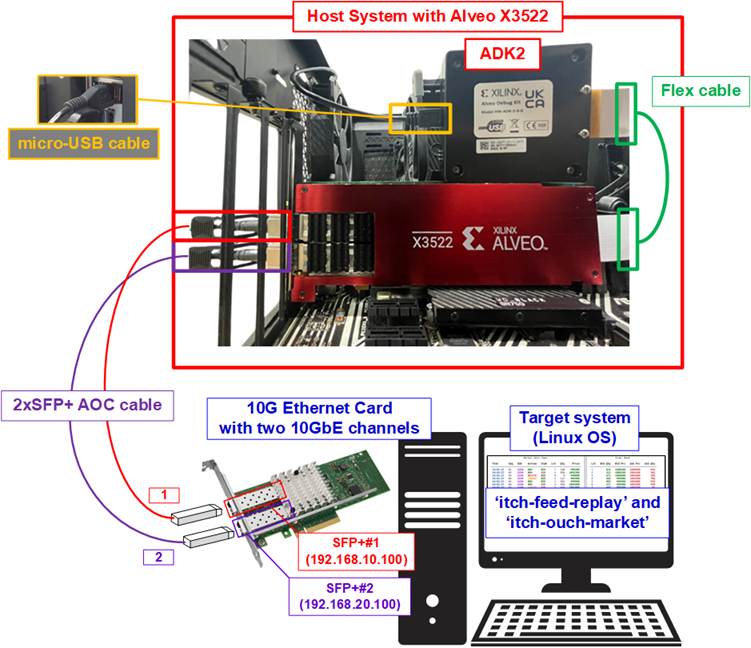
Figure 1 AAT-IP Suite for ITCH-OUCH Demo Using Alveo X3522 Card
2 Target System Setup
This section provides step-by-step instructions for preparing the target system, which is equipped with two 10G Ethernet ports, to exchange market data and order packets with the Alveo accelerator card. The target system runs Ubuntu 22.04 LTS Server OS. Setup involves identifying the correct network interfaces and assigning IP addresses to the two 10G Ethernet ports connected to the Alveo card.
First, identify the logical interface names of the two 10G Ethernet ports connected to SFP+#1 and SFP+#2. These logical names may vary depending on the test environment, so it is important to configure the correct IP address for the SFP+#1 and SFP+#2 connections.
1) Open a Linux terminal and use the following command to list the logical names of the 10G Ethernet ports:
“lshw -C network”.
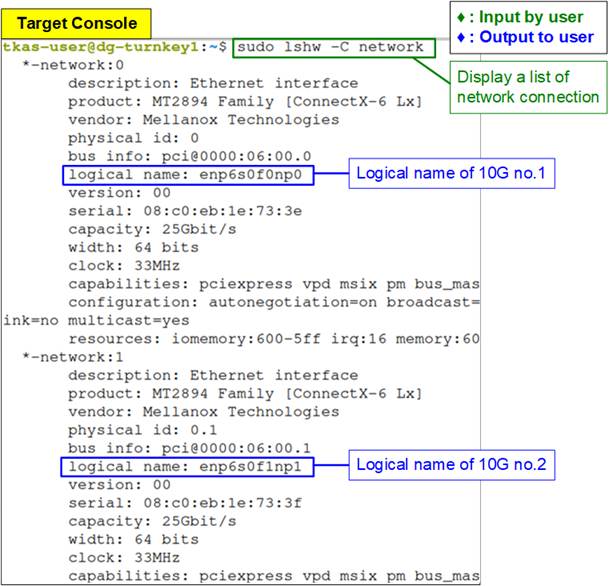
Figure 2 Display Logical Name of 10G Ethernet Ports
The command output displays detailed information about each network interface. For example, Figure 2 shows logical interface names such as “enp6s0f0np0” for SFP+#1 and “enp6s0f1np1” for SFP+#2.
2) Configure the IP address for each Ethernet port using the “ifconfig” command.
· Set SFP+#1 (enp6s0f0np0) to “192.168.10.100”.
· Set SFP+#2 (enp6s0f1np1) to “192.168.20.100”.
Configure the network mask as 255.255.255.0 (i.e., /24 subnet) for both interfaces, as shown in Figure 3.

Figure 3 Configure IP Address and Netmask
3) After assigning the IP addresses and netmask, use the “ifconfig” command to confirm that both Ethernet ports are correctly configured.
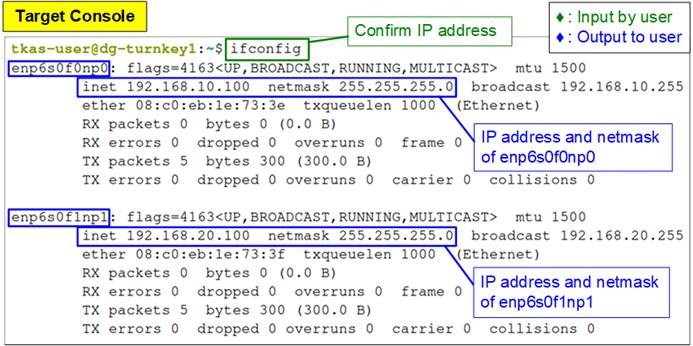
Figure 4 Verify IP Address and Netmask Setting
Ensure that both Ethernet ports are correctly assigned with their respective IP addresses and netmask values.
3 Host System Setup
This section outlines the steps to prepare the host system equipped with an Alveo accelerator card for running the AAT-IPS for ITCH-OUCH demo.
1) The AAT-IPS ITCH/OUCH demo requires packet transfer over PCIe for Alveo card configuration and data exchange. Therefore, the QDMA DPDK driver must be installed on the host system. The installation guide is available on the AMD website under “Building QDMA DPDK Software”:
https://xilinx.github.io/dma_ip_drivers/master/QDMA/DPDK/html/build.html
2) Connect Ethernet and programming cables between Alveo card and the target system. The cabling setup may vary depending on the installed Alveo card. The following steps describe the configuration for the Alveo X3522.
i) Insert two SFP+ transceivers into the SFP+ connectors on the Alveo accelerator card.
ii) Connect SFP+#1 (IP: 192.168.10.100) and SFP+#2 (IP: 192.168.20.100) to the two 10G Ethernet ports on the target system.
iii) For programming the card, connect the Flex cable from the Alveo accelerator card to the Alveo Debug Kit (ADK2). Ensure the Flex cable is securely connected.
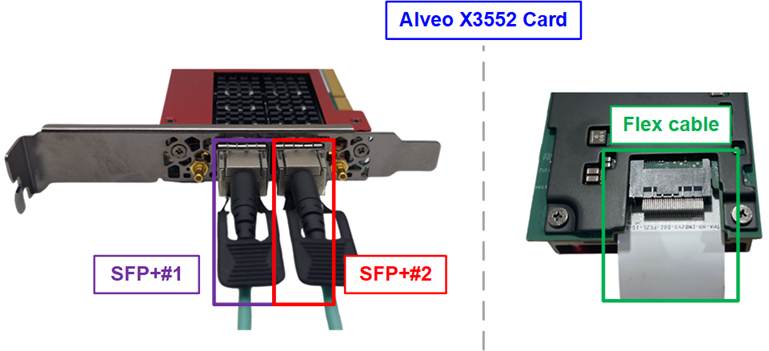
Figure 5 SFP+ and Flex Cable Connection on Alveo X3522 Card
3) Use the Vivado Hardware Manager to program the Alveo card with the required bitstream, as illustrated in Figure 6.
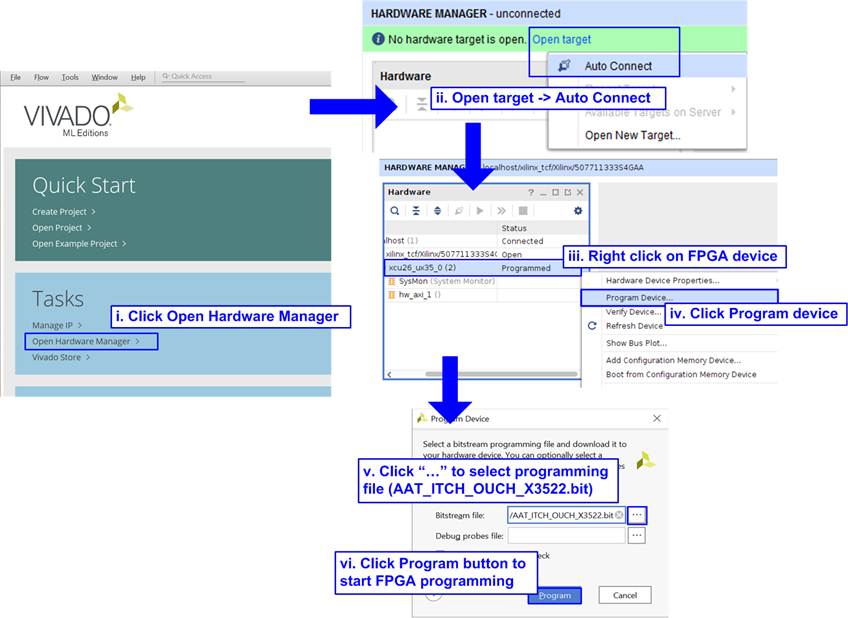
Figure 6 Program Alveo by Vivado Tool
4) Warm reboot the host system and verify that the Alveo card is correctly enumerated by the PCIe subsystem using the “lspci” command.
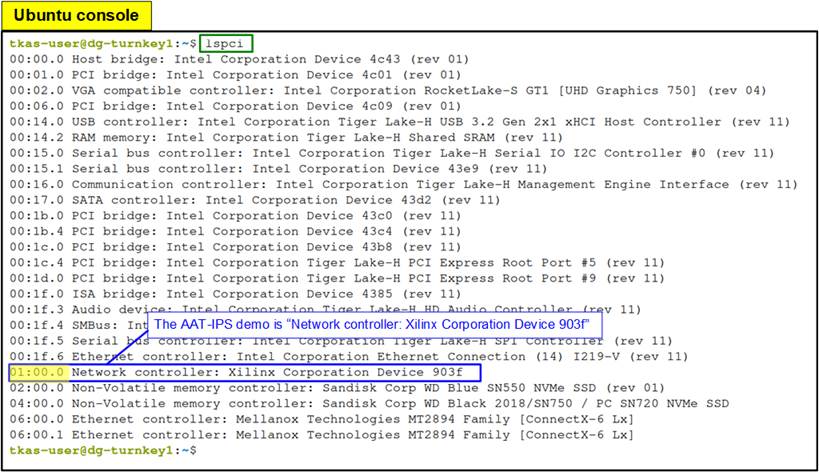
Figure 7 Output of the “lspci” Command After Programming the Alveo Card
The console should display “Network controller: Xilinx Corporation Device 903f”, as shown in Figure 7.
5) Bind the previously installed DPDK driver from step (1) to the Alveo card on the host system.
i) Navigate to the “usertools” directory within the DPDK installation path:
>> cd <DPDK directory>/dpdk-20.11/usertools
ii) Use the following command to bind the vfio-pci driver to the Alveo card:
>> sudo ./dpdk-devbind.py -b vfio-pci 01:00.0
6) Boot the AAT-IPS for ITCH-OUCH demo on the Alveo card by executing the “aat-itch-ouch” application.
i) Navigate to the “download” directory:
>> cd <download directory>
ii) Execute the application:
>> sudo ./software/aat-itch-ouch
After execution, the DPDK and AAT applications will initialize successfully, as shown in Figure 8.
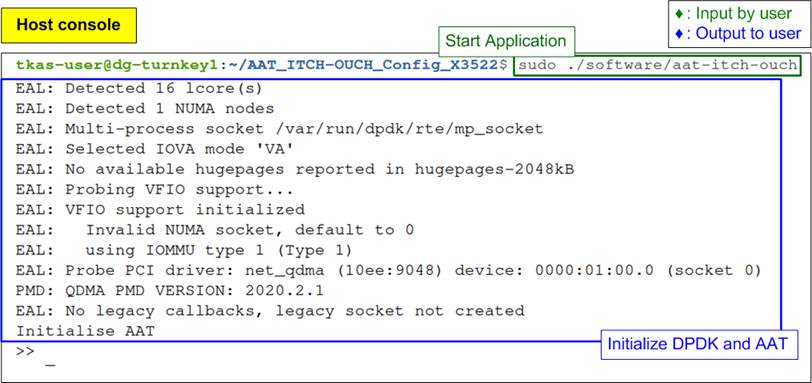
Figure 8 Status Displayed After Executing the Demo Application on the Host System
4 Run AAT ITCH/OUCH Demo
In a price-driven trading environment, the trading workflow consists of three logical sessions: Glimpse, Live Feed, and Order Entry. Each session serves a distinct role in the overall trading process.
· The Glimpse session is used to retrieve an initial snapshot of the order book, allowing the system to establish the current market state before trading begins.
· The Live Feed session continuously delivers real-time market data, enabling the system to monitor price movements and trigger trading decisions.
· The Order Entry session is responsible for submitting buy and sell orders to the market based on the pricing decisions generated by the trading logic.
The demo executes these sessions in the sequence illustrated in Figure 9.
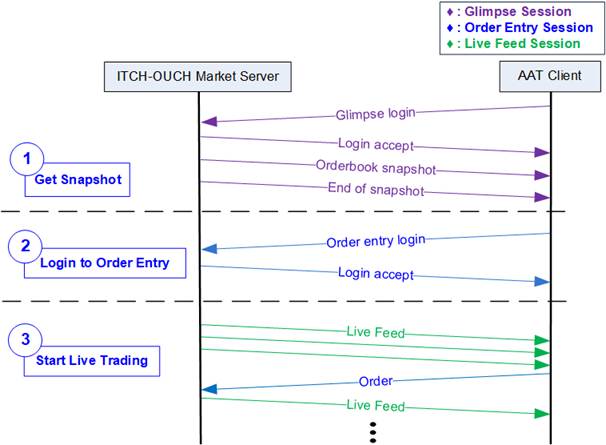
Figure 9 Trading Process Diagram
1) The host system first connects to the ITCH-OUCH Market Server using the Glimpse session to obtain the latest order book snapshot.
2) Next, the host system establishes the Order Entry session with the ITCH-OUCH Market Server to prepare for order submission.
3) Trading begins when the host system subscribes to the Live Feed session of the ITCH-OUCH Market Data Server. As real-time market data is received, the trading logic evaluates predefined conditions and automatically submits orders through the Order Entry session when those conditions are met.
The following sections describe how to configure the Market Server using the provided test software, how to set up the AAT-IPS to connect to the ITCH-OUCH Market Server through the three required sessions, and how to enable order submission. They also explain how to select the simple trading algorithm implemented in hardware and, finally, how to alternatively select and use the pricing algorithm implemented in the host software.
4.1 ITCH-OUCH Market Server Setup
In this demo, the Glimpse and Order Entry sessions use TCP for data transfer, while the Live Feed session uses UDP. The “itch-ouch-market” application emulates the ITCH-OUCH Market Server for both the Glimpse and Order Entry sessions, and the “itch-feed-replay” application emulates the Live Feed session.
Before the host system logs in to the Market Server, the Market Server emulator must be started and ready to accept TCP connections. The following steps describe how to set up the TCP connection.
1) On the target system console, execute the following command to start Market Server emulator:
>>./itch-ouch-market --bind <ip_address> --snapshot <snapshot_file>
The “itch-ouch-market” application requires two parameters:
· <ip_address> : IP address of network interface#2 (enp6s0f1np1) on the target system.
· <snapshot_file> : Path to the initial order book snapshot file used by the ITCH-OUCH Market Server.

Figure 10 Open Market Server
Figure 11 illustrates an example of the Market Server console output. The IP address and TCP port number assigned to each session are displayed.
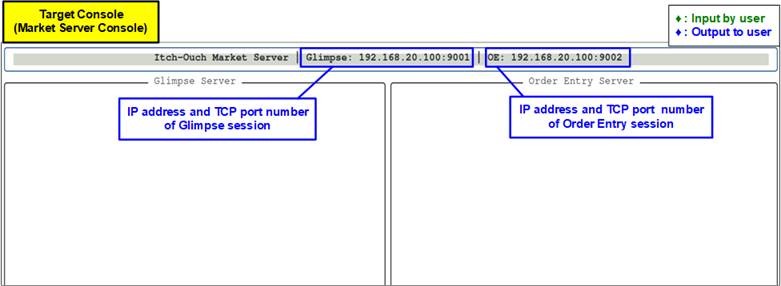
Figure 11 Market Server Emulator Console
2) On the host system, open the aat-itch-ouch console and execute the following command to establish a TCP connection to the ITCH-OUCH Market Server:
>> run support/network.cfg
After executing the command, the Market Server emulator console displays the new connection status, as shown in Figure 12.
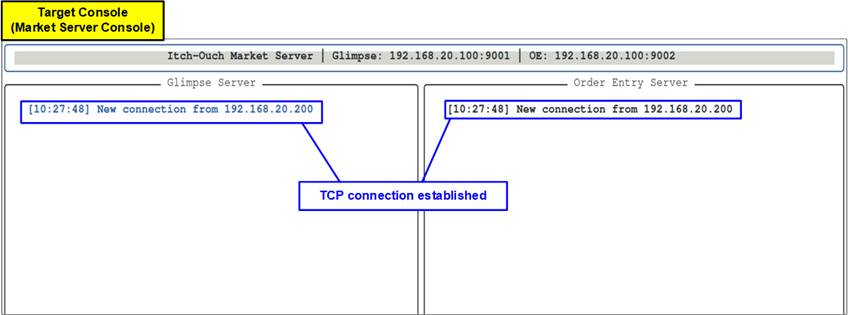
Figure 12 New Connection Status
The host system can also verify the TCP connection status from the aat-itch-ouch console using the following command:
>> tcphandler getstatus
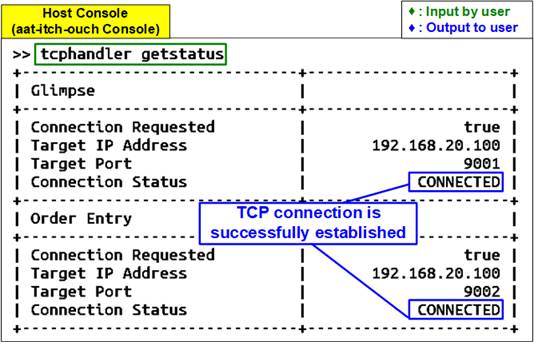
Figure 13 TCP Handler Status
4.2 Host System Initialization
After Glimpse session and Order Entry TCP connections are successfully established, the “aat-itch-ouch” application on the host system is used to retrieve the initial order book snapshot and complete the Order Entry login sequence, as illustrated in Figure 9. Once these steps are completed, the system is ready to submit trading orders.
The following steps describe the host system initialization sequence.
1) On the aat-itch-ouch console, execute the following command to configure the login credentials and connect to the Market Server using the Glimpse session:
>> run support/snapshot.cfg
After the script is executed, the Market Server emulator console indicates a successful login and confirms that snapshot data has been sent, as shown in Figure 14.
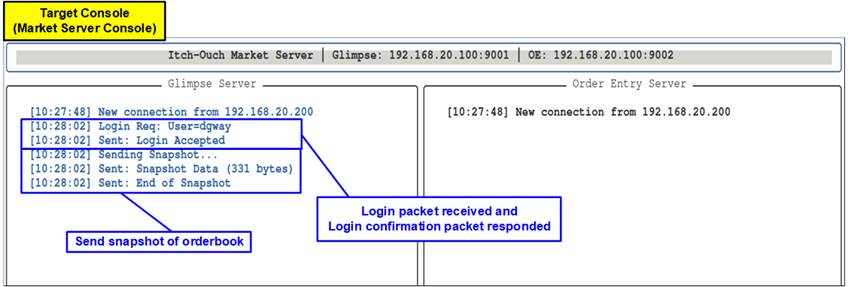
Figure 14 Market Server Console Upon Snapshot Request Completion
2) Verify that the snapshot data has been successfully applied to the order book in the Alveo card by running the following command in the aat-itch-ouch console:
>> orderbook readdata
Figure 15 shows the order book state before and after the snapshot is received.
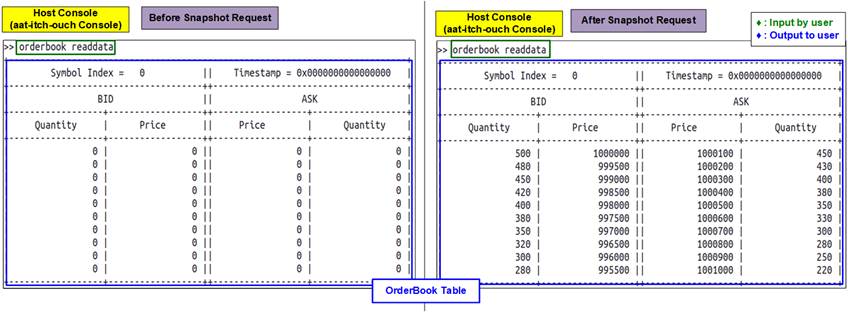
Figure 15 Orderbook Status Upon Snapshot Completion
3) On the aat-itch-ouch console, run one of the following script files to select the pricing engine used to process market data and generate trading orders. Two pricing-engine options are supported:
· Use the “trade_on_card.cfg” script to select the hardware-based pricing engine implemented on the Alveo card. This option minimizes latency between market data reception and order submission. The on-card pricing engine includes a default trading algorithm that generates orders when predefined market conditions are met. The trading algorithm and its parameters can be configured through the console, as described in section 4.4.
>> run support/trade_on_card.cfg
· Use the “trade_on_host.cfg” script to select the software-based pricing engine running on the host system. This option is suitable for more complex trading algorithms that require flexible software-based processing.
>> run support/trade_on_host.cfg.
4) After successful initialization, the Market Server console displays the Order Entry login status, as shown in Figure 16.
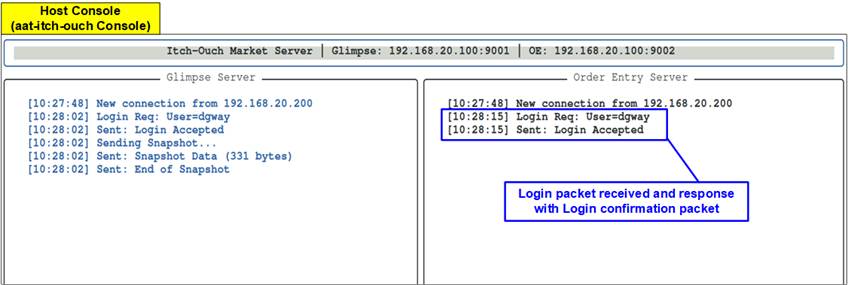
Figure 16 Market Server Console Upon Order Entry Log-in Completion
The Order Entry status can also be verified from the aat-itch-ouch console (the host system) by running the following command:
>> orderentry getstatus

Figure 17 Order Entry Upon Log-in Completion
4.3 Market Data Transmission
To transmit sample market data during the Live Feed session, use the “itch-feed-replay” application on the target system. Two terminal windows are required on the target system: one for the Market Server console and one for the Live Feed console.
Follow the steps below to start market data transmission.
1) On the target system, open a second terminal window for the Live Feed session. Execute the following command to transmit sample market data from a PCAP file using “itch-feed-replay”.
>> ./itch-feed-replay <pcap_file> --bind <ip_address> --source-port <udp_port> --snapshot <snapshot_file>
The “itch-feed-replay” application requires four parameters.
· pcap_file : Path to the market data file in PCAP format used for Live Feed replay.
· ip_address : IP address of network interface#1 (enp6s0f0np0) on the target system.
· udp_port : UDP port number used to transmit Live Feed market data.
· snapshot_file : Path to the initial order book snapshot file used by the Market Server.

Figure 18 itch-feed-replay Parameter
2) After executing the command, the Live Feed console displays two sub-windows:
· The left console decodes and displays the market data messages currently being transmitted to the host system (from the PCAP file), including information such as message sequence number, order ID, and order book actions.
· The right console displays the current state of the order book. This state should match the order book decoded and maintained on the Alveo card.

Figure 19 Live Feed Console
4.4 Trading on Alveo Card
When the Alveo card receives live market data through the Live Feed session and is configured to use the on-card pricing engine, it processes incoming market data and automatically submits orders when the selected trading strategy conditions are met.
For this demo, the following two trading strategies are supported on the Alveo card:
· NONE: When this strategy is selected, the trading logic is disabled. The Alveo card only updates the internal order book based on ITCH market data and does not submit any orders.
· PEG: The PEG (Pegged) strategy with offset is a price-following trading strategy implemented entirely in hardware on the Alveo accelerator card. The strategy continuously monitors the top level of the order book (best bid and best ask) decoded from the ITCH market data stream.
Instead of submitting orders at a fixed price, the order price is dynamically adjusted relative to current market prices using a configurable offset.
When a change is detected at the top of the order book, the on-card pricing engine automatically recalculates the target order price and submits a corresponding order through the OUCH interface.
- Sell-side behavior: When the best ask price changes, the Alveo card generates a sell order with the following price: Sell Price = Best Ask – Offset
- Buy-side behavior: When the best bid price changes, the Alveo card generates a buy order with the following price: Buy Price = Best Bid + Offset
The offset value is configurable and allows control over how aggressively the order is positioned relative to the market. By continuously re-pegging orders to the best bid or best ask, the PEG strategy maintains a competitive position in the order book while reacting to market movements with deterministic, ultra-low latency.
During demo execution, users can configure the trading strategy parameters from the aat-itch-ouch console using the following command:
>> pricingengine setorderbookstrategy <symbol index> <strategy> [parameters0] [parameters1] ...
· <symbol index> : Symbol index to which the strategy is applied. This demo supports only index 0.
· <strategy> : Pricing engine strategy to use. Supported values: “none” or “peg”.
· Strategy parameters
- NONE : No parameters are required.
- PEG : Two parameters are required:
<price_offset> : Offset applied to the best bid or best ask when calculating the order price
<quantity> : Order quantity to be submitted
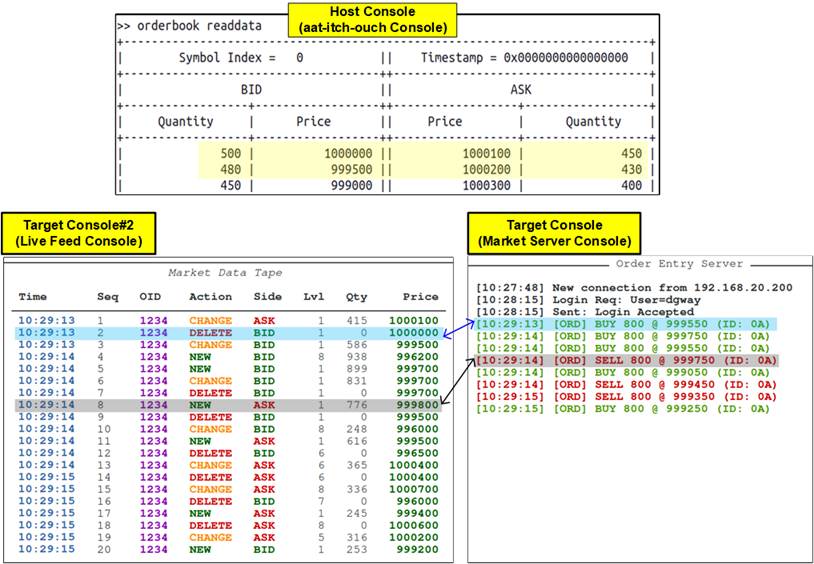
Figure 20 Test Result of PEG Strategy (price_offset=50 and quantity=800)
Figure 20 illustrates the results of the PEG strategy using the default parameters defined in trade_on_card.cfg (price_offset = 50, quantity = 800).
Buy-side example
As shown in Figure 20 - Target Console#2 (Live Feed Console), when packet sequence number 2 (DELETE BID Level 1) is received, the top level of the BID order book is updated. As a result, the Alveo card detects a change in the best bid and triggers the PEG strategy.
The new buy order price is calculated using the updated best bid value from Level 2 of the snapshot table (999500), increased by the configured price offset (50).
Accordingly, the Market Server console shows that a BUY order at 999550 (999500 + 50) is generated, as illustrated in Figure 20 – Market Server Console.
Sell-side example
Later, when packet sequence number 8 (NEW ASK Level 1) is received, as shown in Figure 20 – Live Feed Console, the top level of the ask order book is updated. The Alveo card detects this change and generates a sell order based on the PEG strategy.
The sell order price is calculated from the received ask price (999800), decreased by the configured price offset (50).
As shown in Figure 20 - Target Console (Market Server Console), a SELL order at 999750 (999800 − 50) is generated.
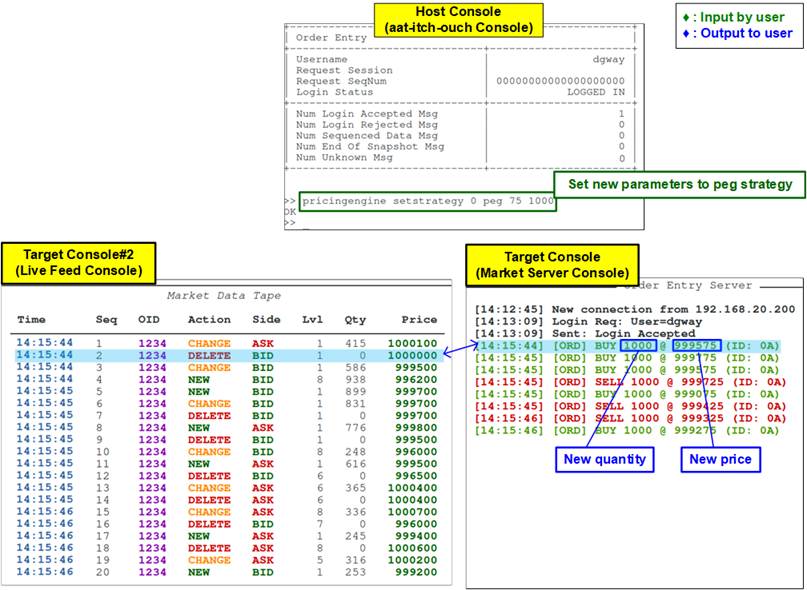
Figure 21 Test Result of PEG Strategy (price_offset=75 and quantity=1000)
Figure 21 illustrates the results of the PEG strategy using the updated parameters (price offset = 75, quantity = 1000). After applying the new offset and quantity settings, the trading behavior changes accordingly.
Compared with the buy-side example shown in Figure 20, when packet sequence number 2 is received, the Alveo card generates a BUY order at 999575 (999500 + 75) with a quantity of 1000.
4.5 Trading on Host Software
When the Alveo card is configured to use the host-based pricing engine, it forwards received market data to host memory via PCIe. The host software retrieves this data, processes it using the selected trading strategy, and automatically generates orders when the strategy conditions are met. These orders are then sent back to the Alveo card over PCIe, and the Alveo card forwards them to the Market Server.
For this demo, the trading strategy implemented in the host software is a PEG-style algorithm with a price offset of 50 and an order quantity of 800. When identical strategy parameters are used, the trading results produced by the host-based pricing engine match those generated by the on-card pricing engine. The primary difference lies in latency, as the host-based approach introduces additional PCIe transfer overhead.
This demo also includes a round-trip time (RTT) measurement feature to evaluate the latency of data transfers between the Alveo card and the host system. To perform the latency measurement while the live market data feed is active, execute the following command in the aat-itch-ouch console:
>> datamover timing
Figure 22 illustrates an example of the RTT measurement result. The measured latency depends on the host system configuration and hardware capabilities.
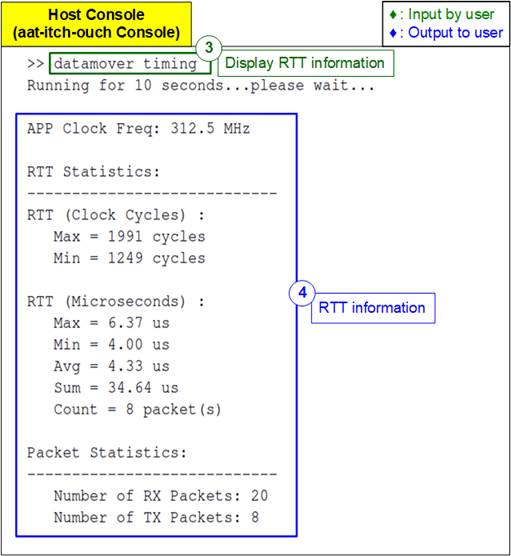
Figure 22 Round-Trip Time Measurement Result
5 Update Hardware via PCIe
In certain deployment environments, remote hardware updates are required. The AAT-IPS for ITCH-OUCH system includes a dedicated hardware module that supports FPGA configuration updates via PCIe, eliminating the need for a physical programming cable. This section describes the two main steps involved in this process: mcs file creation and mcs file programming via PCIe.
To program the mcs file over PCIe, the "xbflash2" utility is required. The utility can be downloaded and installed by following the instructions provided at the link below:
5.1 MCS File Creation
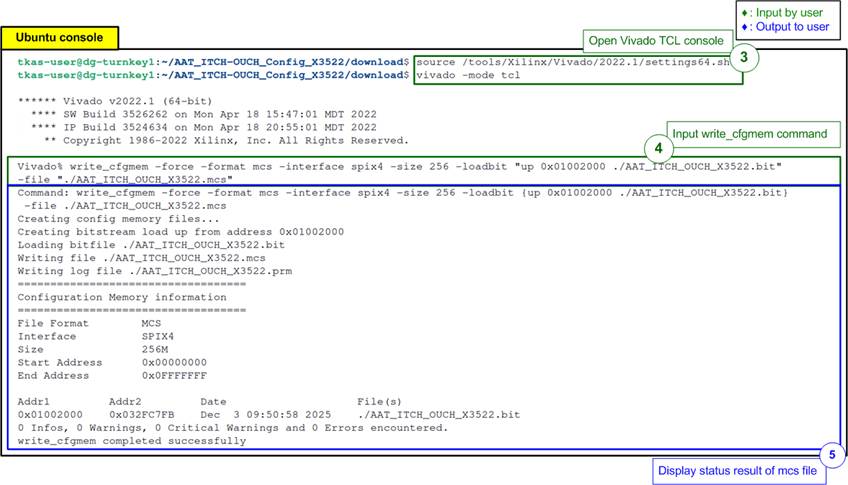
Figure 23 MCS File Creation
1) Open the Vivado Tcl console using the following command:
>> vivado -mode tcl
2) Execute the following command to generate the mcs file from the bitstream:
>> write_cfgmem -force -format mcs -interface spix4 -size 256 -loadbit “up 0x01002000 <input_file.bit>” -file “output_file.mcs”
3) Upon successful completion, the Vivado console displays “write cfgmem completed successfully” message, confirming that the mcs file has been created successfully.
5.2 MCS File Programming via PCIe
1) Before downloading the mcs via PCIe, verify that the Alveo card is not bound to the vfio-pci driver. Use the following command to check the current device binding status:
>> sudo dpdk-devbind.py -s
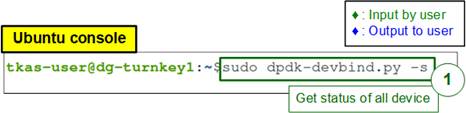
Figure 24 Check Bind Device Bound Status Using DPDK Command
2) Check the binding status of the device displayed on the console. Ensure that the Alveo device is unbound from the vfio-pci driver before proceeding.
a) If the device is unbound, it appears under the “Other Network Devices” section, as shown in Figure 25.
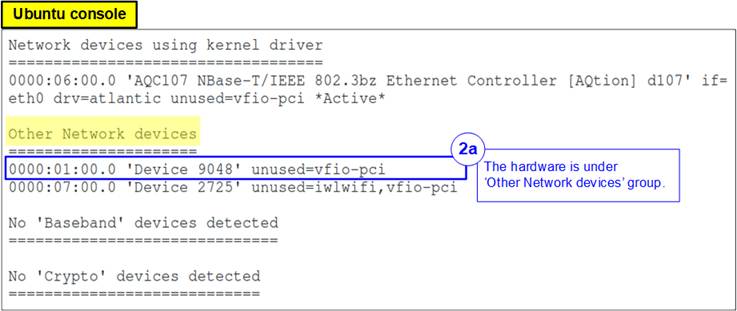
Figure 25 Device Unbound from 'vfio-pci' Driver
b) If the device is bound to the vfio-pci driver, it appears under the “Network devices using DPDK-compatible driver” section, as shown in Figure 26. In this case, unbind the device using the following command:
>> sudo dpdk-devbind.py -u 01:00.0
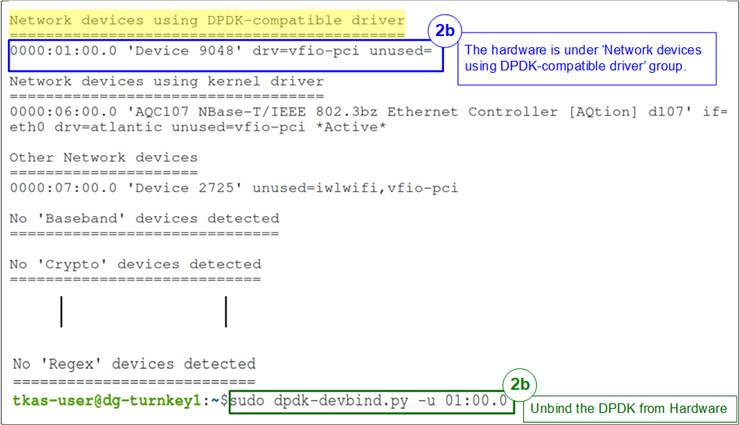
Figure 26 Device Bound to 'vfio-pci' Driver
3) Execute the “xbflash2” utility with root permissions to program the mcs file via PCIe using the following command:
>> sudo xbflash2 program --spi --image <target_mcs_file>.mcs --bar 2 --bar-offset 0x80000 -d <BDF>
Note: The parameters “bar” and “bar-offset” are specific to the default AAT-IPS for ITCH-OUCH demo design. If the card is programmed with a non-default hardware configuration, these parameters may need to be adjusted accordingly.
4) When prompted, enter ‘Y’ to confirm the programming operation.
5) Wait for the following message to appear on the console, indicating that programming has completed: “Cold reboot machine to load the new image on device”.
6) Perform a cold reboot of the system. After rebooting, the new hardware configuration is permanently applied to the Alveo card.
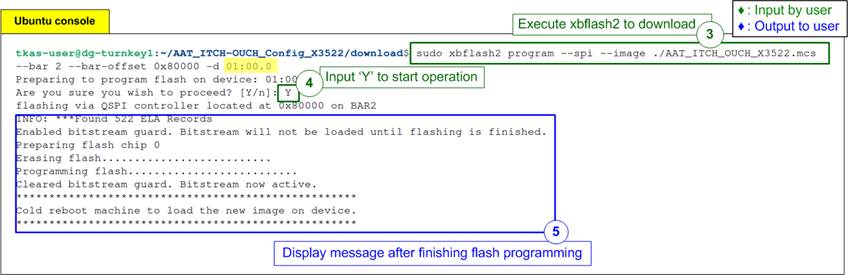
Figure 27 “xbflash2” Programming
6 Revision History
|
Revision |
Date (D-M-Y) |
Description |
|
1.00 |
26-Jan-26 |
Initial version release |